Showing posts with label other dessert. Show all posts

Monday, June 20, 2011

Super Fudgy Brownies

 Last weekend I made these brownies to serve at my cousins bridal shower. Since I have become a lazy blogger, I didn't really have any intentions of posting the recipe. But after several requests for the recipe and one woman even declaring it "the best brownie she had ever eaten," I knew this one was a keeper! They were really moist and fudgy without being gooey. I am posting the original recipe below with a few notes in parentheses. One other thing to note is that I ran out of granulated sugar while making these and replaced it with coarse sugar. I am not sure how much of an impact this made on the brownies so I will have to experiment with that in the future, but I am sure the results would be similar either way! I was just happy to know that you could use coarse sugar without it resulting in a grainy texture.

The Baked Brownie (from Baked: New Frontiers in Baking and seen on Divine Baking)
Ingredients:
  • 1 1/4 c all-purpose flour
  • 1 tsp salt
  • 2 T dark unsweetened cocoa powder (I used dutch process cocoa)
  • 11 oz dark chocolate, chopped (I used Ghiradelli 60% cacao)
  • 1 c unsalted butter, cut into 1 inch pieces
  • 1 tsp instant espresso powder (I omitted b/c I didn't have)
  • 1 1/2 c granulated sugar
  • 1/2 c packed light brown sugar
  • 5 large room temperature eggs
  • 2 tsp pure vanilla extract
Directions:
1. Preheat oven to 350 degrees F.
2.  Spray a 9x13 pan with nonstick baking spray (or butter and flour pan).
3.  In a medium bowl, whisk together the flour, the salt, and cocoa powder.
4. Set up a large sized double boiler. Place the chocolate, the butter, and the instant espresso powder (if using) in the bowl of the double boiler and stir occasionally until the chocolate and butter are completely melted and combined. Turn off the heat, but keep the bowl over the water of the double boiler and add both sugars. Whisk the sugars until completely combined and remove the bowl from the pan. Mixture should be room temperature.
5. Add three eggs to the chocolate mixture and whisk until just combined. Add remaining eggs and vanilla, whisking to combine. Do not over beat the batter or else the brownies will become cakey. 
6. Gently mix the flour/cocoa/salt into the chocolate with a spatula (not a whisk) just until incorporated.
7. Pour the mixture into the prepared pan.
8. Bake the brownies for about 30 minutes or until a toothpick comes out with just a few moist crumbs. Mine took 31 minutes, but you may want to check them early because everyone's oven is different, and you definitely don't want to over bake them!

Sunday, April 3, 2011

Samoas Bars

It has become the tradition here on Chicken on the Green to post the special treat made to honor Meggo's Birthday! For her 25th, there was the Strawberry Chantilly Cake. For her 26th, I made Monster Cookies. And today.... SAMOAS BARS! I chose to make these because Samoas (or Caramel deLites as they are known in some parts of the country such as Wichita) are Meggo's favorite Girl Scout cookies! She would buy them at work and then hide them in her desk. Meggo, please don't hide these. They do not quite have the same preservatives in them!
 I found the recipe for these on Baking Bites. These bars start with a shortbread cookie crust, then are covered with caramel and toasted coconut, dipped in dark chocolate, and topped with a dark chocolate drizzle. Yummy. They are fun to make although they do take some time. They are very reminiscent of the original, but if I am going to be completely honest, I don't quite think they match up to the perfected recipe those girl scouts have come up with. Man, they must work hard on those.
Samoas Bars (adapted from Baking Bites)
Ingredients:
Cookie Base:
  • 1/2 cup sugar
  • 3/4 cup butter, softened
  • 1/2 tsp vanilla extract
  • 2 cups all purpose flour
  • 1/4 tsp salt
Topping:
  • 3 cups shredded coconut (sweetened or unsweetened)
  • 12-oz good-quality chewy caramels
  • 1/4 tsp salt
  • 3 tbsp milk
  • 10 oz. dark or semisweet chocolate (chocolate chips are ok)
Directions:
To make the crust:
1. Preheat oven to 350F.
2. Line a 9×13-inch baking pan with nonstick foil and spray with nonstick cooking spray. (I really didn't want it to stick).
3.  In a large bowl, cream together sugar and butter, until fluffy. Add vanilla extract.
4. Working at a low speed, gradually beat in flour and salt until mixture is crumbly, like wet sand. The dough does not need to come together.
5. Scoop crumbly dough into prepapred pan and press into an even layer.
6. Bake for 20-25 minutes, until base is set and edges are lightly browned. Cool completely on a wire rack before topping.

To make the topping:
1. Unwrap the caramels and place in a large microwave-safe bowl with milk and salt. Cook on high for 3-4 minutes, stopping to stir a few times to help the caramel melt. When smooth, fold in toasted coconut with a spatula.
2. Put dollops of the topping all over the shortbread base. Using the spatula, spread topping into an even layer. Let topping set until cooled.
3. When cooled, cut into 30 bars with a large knife.
4. Once bars are cut, melt chocolate in a small bowl. Heat on high in the microwave in 45 second intervals, stirring thoroughly to prevent scorching. Dip the base of each bar into the chocolate and place on a clean piece of parchment or wax paper. Transfer all remaining chocolate (or melt a bit of additional chocolate, if necessary) into a piping bag or a ziploc bag with the corner snipped off and drizzle bars with chocolate to finish. (I had to melt more chocolate because I had bits of shortbread that fell in my chocolate.)
5. Let chocolate set completely before storing in an airtight container.


Saturday, November 6, 2010

Rustic Cranberry Apple Galette with Preserved Walnuts

 I love "rustic" dishes because basically that means you don't have to be precise or make it look perfect. It's charming all on its own. This galette was full of fall flavors, and I loved that it wasn't overly sweet. I also liked the pop of the tart cranberries contrasted with the sweetness of the apples. The addition of the preserved walnuts was a special treat, but you can definitely substitute regular walnuts or leave them out altogether. I had never even heard of preserved walnuts before, but Nick's mom gave us some on our last visit. I was determined to find a way to use them seeing as they aren't the most common ingredient, and this dessert was perfect because they complemented the fruits well. Another plus about this recipe is that it is so easy I was able to throw it together on weeknight!
 Rustic Cranberry Apple Galette with Preserved Walnuts
Ingredients:
  • 1 unbaked pie crust
  • 2 large apples, large diced- about 1 lb (I used Jonagold) 
  • 1/2 cup cranberries
  • 1/2 cup chopped preserved walnuts (or regular walnuts)
  • 1.5 Tbsp cinnamon
  • 3 Tbsp sugar
Directions:
  1. Pre heat oven to 350 degrees F.
  2. Toss apples, cranberries, walnuts, cinnamon and sugar together in a bowl.
  3. Roll out pie crust and place on a baking sheet lined with parchment paper.
  4. Place cranberry apple filling in middle of the pie crust, leaving a border of about 1-2 inches. The pile will probably appear to be too much/too high, but this is ok because it will cook down. 
  5. Bake for about 45 minutes or until pie crust has browned slightly.
  6. Let cool for at least 15-20 minutes before serving. 

Sunday, October 31, 2010

Pumpkin Whoopie Pies

 I think the best thing about fall is pumpkin- actually I know it is the best thing! I first made these whoopie pies about 3 years ago and never made them again because they were too addictive! The soft, moist texture of the cookie/cake is hinted with fall spice and the sweetness is matched perfectly with the slightly tangy cream cheese filling. I knew it was time for the hiatus to end so this pumpkin lover's birthday could be properly celebrated! These treats are perfect for Halloween, Thanksgiving, or even your office party :)

Pumpkin Whoopie Pies (adapted from Brown Eyed Baker)
Makes about 2 dozen whoopie pies 
Ingredients:
For Whoopie Pies-
  • 3 cups all-purpose flour
  • 2 tablespoons cinnamon
  • 1 teaspoon baking powder
  • 1 teaspoon baking soda
  • 1 teaspoon salt
  • 1½ teaspoons pumpkin pie spice
  • 1 cup granulated sugar
  • 1 cup dark brown sugar
  • 1 cup canola or vegetable oil
  • 3 cups canned pumpkin puree
  • 2 eggs
  • 1 teaspoon vanilla extract
For Maple Cream Cheese Filling:
  • 2.5 - 3 cups powdered sugar (start with 2.5 and add more if you want it sweeter!)
  • 8 ounces reduced fat cream cheese, at room temperature
  • 1 stickunsalted butter, at room temperature
  • 3 tablespoons maple syrup (I used grade A dark amber)
  • 1 teaspoon vanilla extract
    Directions:
    1. Preheat oven to 350 degrees F. Line baking sheets with parchment paper.
    2. In a large bowl, whisk together the flour, cinnamon, baking powder, baking soda, salt, and pumpkin pie spice. 
    3. In a separate bowl, add the granulated sugar, dark brown sugar, oil, pumpkin puree, eggs and vanilla together and whisk until combined.
    4. Gradually add the flour mixture to the pumpkin mixture and stir just until completely combined.
    5. Use a large spoon to drop a rounded, heaping tablespoon of the dough onto the prepared baking sheets, about 1 inch apart.
    6. Bake for 10 to 12 minutes, until they look done and a toothpick inserted into the center of a cookie comes out clean. The cookies should be firm, but not overly so when touched. Remove from the oven and let the cookies cool completely.
    7. To make the filling, beat the butter on medium speed until smooth. Add the cream cheese, maple syrup, and vanilla. Beat until smooth and combined, about 2 minutes. Add the powdered sugar and beat until smooth.
    8. To assemble the whoopie pies: Turn half of the cooled cookies upside down. Pipe or spoon the filling onto that half. Place another cookie, flat side down, on top of the filling. Press down slightly so that the filling spread to the edges of the cookie. Repeat until all the cookies are used.
    9. Store in a single layer if possible, but if not, use parchment paper between layers. 

    Friday, July 9, 2010

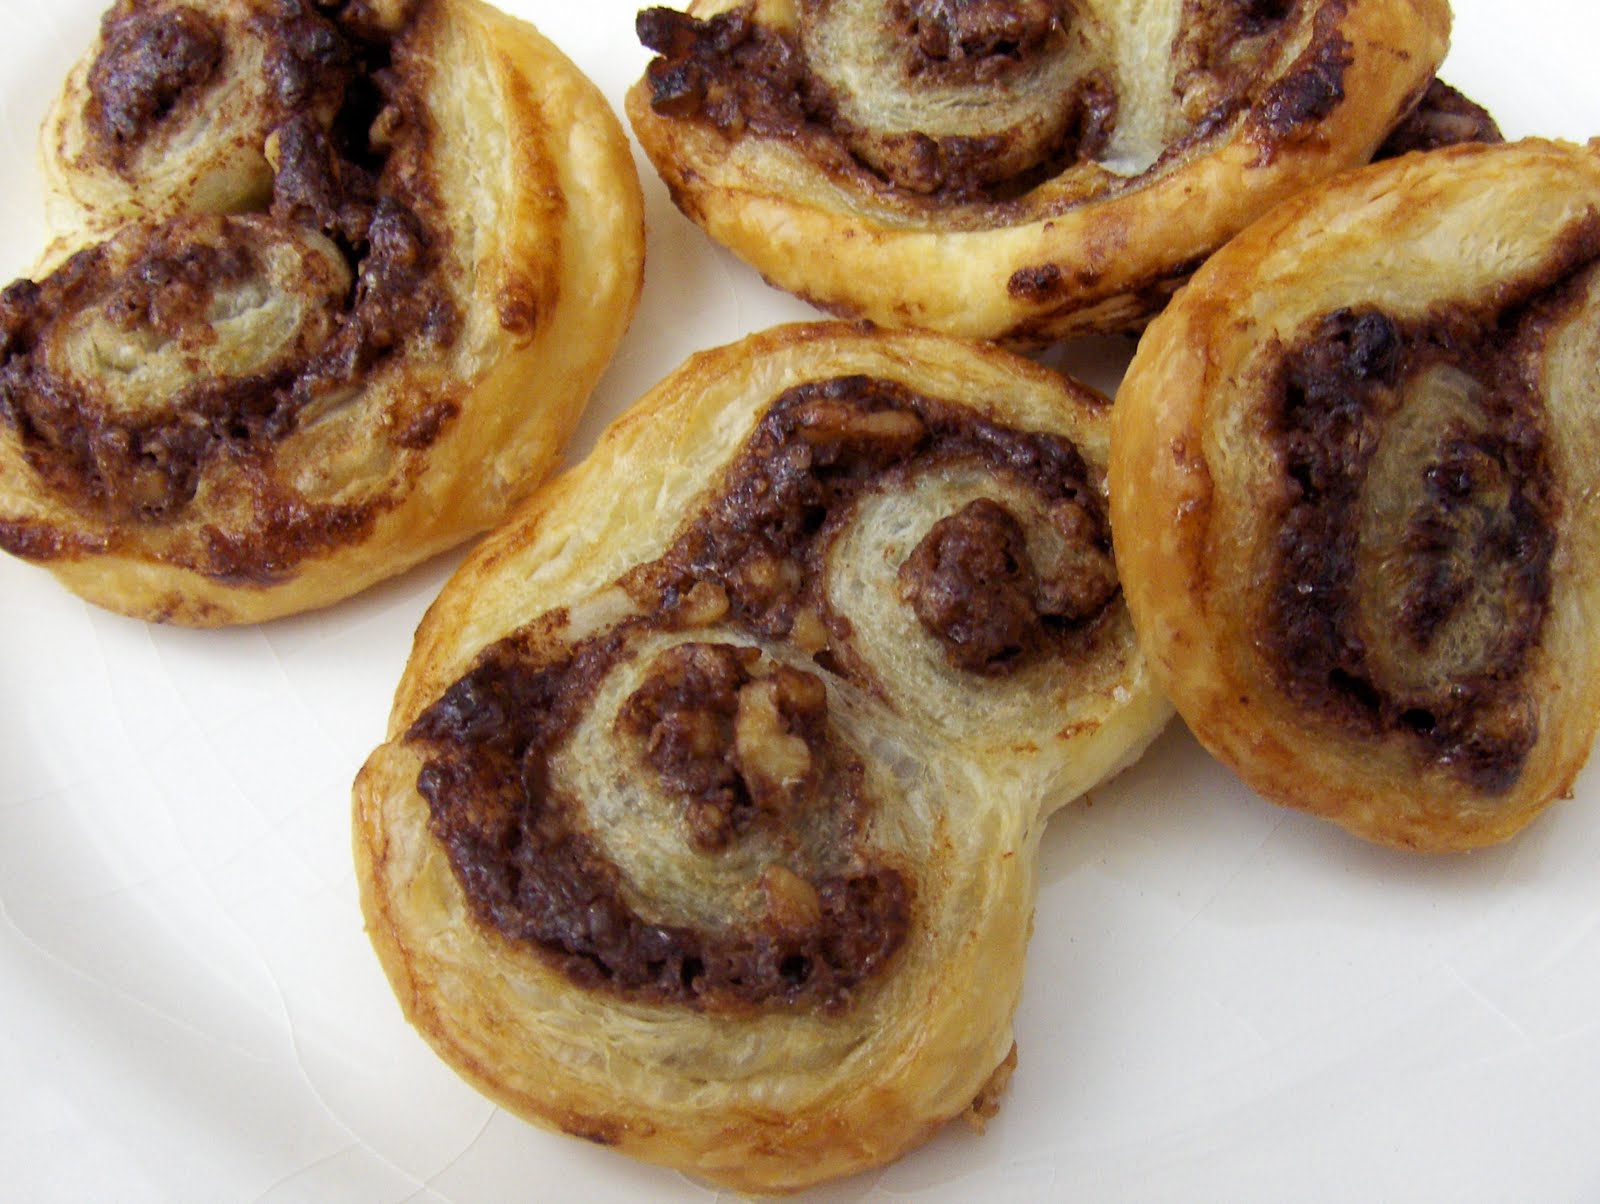
    Nutella Palmiers

      I had never even heard of a "palmier" before I stumbled across this recipe. In fact, I had to google it to see what it was! Turns out that Epicurious defines it as, "puff pastry dough that is sprinkled with granulated sugar, folded and rolled several times, then cut into thin strips. After baking, these golden brown, caramelized pastries are served with coffee or tea or as a dessert accompaniment" Sounds good to me! These are actually a little different than the traditional palmier because they are made with Nutella and walnuts rather than cinnamon and sugar. Chocolate makes everything better, right? One of the best things about this recipe is how easy and quick it is (not to mention delicious!)
    Ingredients:
    13 oz Puff Pastry, thawed
    1/2 cup Nutella
    1/4 to 1/2 c walnuts, chopped
    granulated sugar

    Directions:
    1. Preheat oven to 425F degrees. Lightly grease a cookie sheet or line the sheet with a Silpat silicone baking mat.
    2. On a lightly floured surface, roll out the puff pastry into a rectangular shape (approximately 15 x 9 inches).
    3. Spread the Nutella evenly over the puff pastry. Then sprinkle the nuts over the top.
    4. Roll both long ends toward the center until they meet. Where the pieces meet, try to press the edges together as best you can. (It was suggested to dampen them with water, but that didn't really work for me).
    5. Using a sharp knife, cut the dough into thin slices. Place on the prepared cookie sheet.
    6. Sprinkle the tops of the cookies with the sugar, then bake for 10-15 minutes, or until golden brown. 7. Let cool before serving them with coffee.

    Sunday, June 13, 2010

    Vanilla Ice Cream

    I have had my ice cream maker for close to 3 years now. I just took it out of its box about 2 weeks ago. I can't believe I wasted all that time... It is a mistake I am sure I won't make again as I am already debating what flavor to make next! I made classic vanilla ice cream for my first flavor because it goes so well with other desserts such as cobbler and chocolate cake! While vanilla is not typically my favorite flavor, this was so good that I couldn't help but sneak a bite every time I opened the freezer to get it out for Nick!
    What is better than homemade ice cream?
    Homemade Ice Cream with SPRINKLES!
    Vanilla Ice Cream (adapted from Simply Recipes and Alton Brown)
    Makes 1.5 Quarts
    Ingredients:
    • 7 egg yolks
    • 2 cups heavy cream
    • 2 cups whole milk
    • 3/4 cup sugar
    • 1.5 Tbsp vanilla extract 
    Directions:

    1. Pour the heavy cream and milk into a saucepan, over medium heat. Bring the mixture just to a simmer, stirring occasionally, and remove from the heat.
    2. In a medium bowl, whisk the egg yolks until they become pale in color. (I whisked/beat them for 3-5 minutes.) Add the sugar and whisk to combine. 
    3. Temper the cream mixture into the eggs and sugar by gradually adding small amounts, until about half of the cream mixture has been added.  It is CRITICAL that you do this very slowly so you don't cook the eggs.
    4. Pour in the rest of the cream and return the entire mixture to the saucepan. Place over low heat. Continue to cook, stirring frequently, until the mixture thickens slightly and coats the back of a spoon. If you have a thermometer, it should be about 170 to 175 degrees F.
    5. Pour the mixture into a container and allow to sit at room temperature for 30 minutes. Stir in the vanilla extract. 
    6. Place the mixture into the refrigerator, cover and store for 4 to 8 hours or until the temperature reaches 40 degrees F or below. 
    7. Pour into an ice cream maker and process according to the manufacturer's directions. This should take approximately 25 to 35 minutes. Serve as is for soft serve or freeze for another 3 to 4 hours to allow the ice cream to harden.


    Monday, February 15, 2010

    Red Velvet Whoopie Pies

    Happy Valentine's Day! I saw these cute treats on Annie's Eats and immediately knew that I wanted to make them for my valentine! Red velvet and cream cheese frosting were made to go together, and this recipe is great way to show off what great combination they are outside of the typical cake form. They can also be made in the traditional round shape rather than hearts and be eaten year round- not as just a valentine's treat. Or you could make them in heart shape to share the love all year long :)
     
    I followed the directions exactly as written on Annie's blog, and they turned out great!  My hearts didn't turn out perfectly, but they aren't too bad :)

    For the cookies:
    2 cups all-purpose flour
    2 tbsp. cocoa powder
    ½ tsp. baking powder
    ¼ tsp. salt
    8 tbsp. unsalted butter, at room temperature
    1 cup light brown sugar, packed
    1 large egg
    1 tsp. vanilla extract
    ½ cup buttermilk, at room temperature
    1 oz. red food coloring

    For the frosting:
    8 oz. cream cheese
    5 tbsp. unsalted butter, at room temperature
    2 tsp. vanilla extract
    2½ cups confectioners’ sugar, sifted

    Directions:
    1. Preheat the oven to 375˚ F.
    2. Using a heart template (I cut mine out of a paper plate), trace evenly spaced hearts onto pieces of parchment paper sized to fit two cookie sheets.  Place the parchment on the cookie sheets so that the side you have drawn on is facing down; set aside. 3. In a medium bowl, whisk together the flour, cocoa powder, baking powder and salt.
    4. In the bowl of a stand mixer fitted with the paddle attachment, cream together the butter and brown sugar on medium-high speed until light and fluffy, about 2 minutes.
    5. Beat in the egg until incorporated, scraping down the sides of the bowl as necessary.
    6. Blend in the vanilla.
    7. With the mixer on low speed, beat in about a third of the dry ingredients, followed by half of the buttermilk, beating each addition just until incorporated.  Repeat so that all the buttermilk has been added and then mix in the final third of dry ingredients.  Do not overbeat. 
    8. Blend in the food coloring.
    9. Transfer the batter to a pastry bag fitted with a large plain round tip (I just cut an opening in the corner of a quart sized ziploc).  Pipe the batter onto the parchment paper using the heart tracings as a guide.
    10.  Bake 7-9 minutes or until the tops are set.  Allow the cookies to cool on the baking sheets  for at least 10 minutes, until they can be easily transferred to a cooling rack.  Repeat with any remaining batter. 
    11. To make the cream cheese frosting, in the bowl of a stand mixer fitted with the paddle attachment beat the cream cheese and butter on medium-high speed until well combined and smooth, about 2-3 minutes.  Mix in the vanilla extract.  Gradually beat in the confectioners’ sugar until totally incorporated, increase the speed and then beat until smooth.
    12. Allow cookies to cool completely before proceeding.
    13. Flip one cookie of each pair over so that the flat side is facing up.
    14. Pipe frosting onto the flat-sided cookie of each pair.  Sandwich the cookies together so the flat sides are facing each other and press together gently.

    Sunday, October 25, 2009

    Snickers Blondies

    I made these blondies for Dub's birthday, which was actually a couple weeks ago but I was a little late in making them (thanks CPA exam)! I chose to make these because bars are easy to transport/give as gifts, and Dub loves candy so I added some Snickers to the batter. I made one pan to give away and then a half pan to keep so that we got to try them too :) I was quite pleased with them- definitely my favorite of all the blondies recipes that I had tried previously! I am pretty sure that Nick, Matt, Blake, and Nat liked them too... Unfortunately they went so fast that I didn't get a very good picture! So, keep in mind that this picture really doesn't do them justice!


    Snickers Blondies (adapted from 3B's Toffee Blondies)

    Ingredients:
    2 cups all-purpose flour
    1 tsp baking powder
    1/4 tsp baking soda
    1 tsp salt
    2 c brown sugar (I used 1 cup light brown sugar and 1 cup dark brown)
    2 sticks melted unsalted butter
    2 large eggs
    1/2 tsp vanilla
    4 Snickers bars, chopped

    Directions:
    1. Preheat oven to 350 degrees.
    2. Into a large mixing bowl, mix together: all-purpose flour,baking powder, baking soda, and salt.
    3. In a second bowl, beat together brown sugar with melted butter.
    4. Add egg and vanilla to butter/sugar mixture and mix well.
    5. Stir the flour mixture into the butter mixture.
    6. Fold in the chopped Snickers bars.
    7. Spray a 9x13 pan with Pam for Baking.
    8. Pour batter into prepared pan and bake for 20-25 minutes. This time is approximate because I used an 8x8 pan and a 4x8 pan rather than one large pan so make sure you watch it- it is done when a toothpick can be inserted and comes out clean.

    Sunday, August 23, 2009

    Sopapilla Cheesecake Bars


    So, it has been a while since I blogged, but I have a few recipes to post to catch up! The first is sopapilla cheesecake bars. Last night, we had a wedding shower for Cath and Trone- it was fiesta themed so I wanted to put a little bit of a Mexican spin on the desserts! I came across this recipe from AllRecipes.com and thought it would be perfect for the occasion. Also, they had such good reviews that I figured they would be a safe decision.
    They turned out great! They definitely aren't the most healthy option, which became clear as I was pouring half a cup of butter over them... But apparently they were a crowd pleaser because there was only one left at the end of the night (which got eaten quickly the next day...)! I made 2 small modifications to the original recipe by leaving out the almonds and I replaced 1 package of regular cream cheese with reduced fat (healthy, right?!?) The recipe as I made it is below:

    INGREDIENTS

    * 2 (8 ounce) packages cream cheese, softened
    * 1 (8 ounce) package reduced fat cream cheese, softened
    * 1 1/2 cups white sugar
    * 1 1/2 teaspoons vanilla extract
    * 2 (8 ounce) cans crescent roll dough

    * 1/2 cup melted butter
    * 1/2 cup white sugar
    * 1 teaspoon ground cinnamon

    DIRECTIONS

    1. Preheat an oven to 350 degrees F .
    2. Beat the cream cheese with 1 1/2 cups of sugar, and the vanilla extract in a bowl until smooth. Unroll the cans of crescent roll dough, and use a rolling pin to shape the each piece into 9x13 inch rectangles. Press one piece into the bottom of a 9x13 inch baking dish. Evenly spread the cream cheese mixture into the baking dish, then cover with the remaining piece of crescent dough.
    3. Drizzle the melted butter evenly over the top of the cheesecake. Stir the remaining 1/2 cup of sugar together with the cinnamon in a small bowl, and sprinkle over the cheesecake.
    4. Bake in the preheated oven until the crescent dough has puffed and turned golden brown, about 45 minutes. Cool completely in the pan before cutting into 12 squares. (I refrigerated them overnight before cutting so they were really easy to cut cleanly).

    Tuesday, June 30, 2009

    Easy Banana Puddin'


    Last night Matt came over as our dinner guest! We had a good time and devoured some paella. Then, for dessert we had some banana pudding. This was a really easy recipe that I found on All Recipes. I wanted to make it because Publix's version of Nilla wafers were the penny item a couple weeks ago, and what do you do with Nilla wafers?? You make banana pudding! No other options!
    Nick and Matt eating their pudding

    Matt sporting the Chicken on the Green apron

    I pretty much followed the recipe as written but did substitute for a couple of lower fat things. You can find the original here. The recipe with my changes is below:
    Ingredients:
    * 1 (8 ounce) package reduced fat cream cheese
    * 1 (14 ounce) can sweetened condensed milk
    * 1 (5 ounce) package instant vanilla pudding mix
    * 3 cups cold milk (I used 2%)
    * 1 teaspoon vanilla extract
    * 1 (8 ounce) container lite frozen whipped topping, thawed
    * 4 bananas, sliced
    * 1/2 (12 ounce) package vanilla wafers
    Direction:
    1. In a large bowl, beat cream cheese until fluffy. Beat in condensed milk, pudding mix, cold milk and vanilla until smooth. Fold in 1/2 of the whipped topping.
    2. Line the bottom of a 9x13 inch dish with vanilla wafers. Arrange sliced bananas evenly over wafers. Spread with pudding mixture. Top with remaining whipped topping. Chill.

    Sunday, April 5, 2009

    Blackberry Cheesecake Bars

    Before I went on vacation, I wanted to make Nick a treat to compensate for the the fact that I was going to the beach while he was stuck working:) (I am sure he thought that was a fair exchange as well!) I didn't have much time so I picked a recipe for cheesecake bars that I found here because 1) I wouldn't have to buy much, 2) It was quick and easy to make, 3) He likes cheesecake. The recipe is for strawberry cheesecake bars, but we had blackberry preserves so that is what I made- you could use any kind you want though and they would be delicious! You can also halve the recipe and bake it in a loaf pan if you want.

    Ingredients:
    1 ¼ cups graham crumbs
    ¼ cup butter, melted
    2 (8 oz) packages cream cheese, softened at room temperature
    3/4 cup sugar
    1 1/2 Tbsp flour
    3 tbsp of lemon juice
    2 eggs
    1/3 cup blackberry preserves

    Directions:
    1. Preheat oven to 325ºF. Grease and line an 8” x 8” square baking with parchment paper or nonstick foil (for easy removing you slices later)
    2. Mix crumbs and butter together and press firmly into bottom of the pan. Set it aside.
    3. Beat cream cheese, sugar, flour and lemon juice in large bowl with electric mixer on medium speed until well blended. Add eggs, one at a time, beating on low speed after each addition, just until blended.
    4. Pour cream cheese mixture over crust.
    5. Heat blackberry preserves slightly in the microwave (like 15 seconds). Gently drop preserves by small spoonfuls over top of batter. Use a knife and drag it through preserves and cheesecake batter to swirl.
    5. Bake approx 40 min. or until center is set. Cool. Refrigerate at least 2 hours or overnight before cutting it.

    Thursday, February 26, 2009

    Cinnamon Apple Bars

    Happy Birthday to Marcus, Happy Birthday to Marcus! I have had a bag of cinnamon chips that I was saving for a special occasion and it turns out that Marcus's 26th Birthday was that occasion! I found these apple cinnamon bars on the blog Culinary in the Desert, and thought they looked delicious so I chose to make those. They were tasty, and it seems that they reminded most people of a carrot cake type taste (which is one of my favorite desserts)- maybe it was the cream cheese frosting! My version of the recipe is posted below, and sorry they were not very photogenic :)


    Here are a couple pics of Marcus with his treats :)


    Frosted Cinnamon Apple Bars (Adapted from Land O Lakes)

    For the bars

    1 1/2 cups old-fashioned rolled oats
    1 1/3 cups white wheat flour
    3/4 teaspoon baking soda
    4 tablespoons unsalted butter, softened
    8 tablespoons salted butter, softened
    3/4 cup packed brown sugar
    1/2 cup sugar
    2 large eggs
    1 teaspoon vanilla
    8 ounces cinnamon chips
    1 cup chopped apples

    For the frosting

    4 tablespoons unsalted butter, softened
    4 ounces cream cheese, softened
    1 teaspoon vanilla
    2 cups confectioners' sugar, sifted

    To make the bars

    Preheat oven to 350

    In a medium bowl, whisk together oats, flour, salt and baking soda.

    In a large mixing bowl, beat together butter, brown sugar and sugar until creamy. Add eggs, one at a time, beating until well combined. Mix in vanilla. Add flour mixture and mix just until combined. Stir in cinnamon chips and chopped apple.

    Spread the mixture into a 9" x 13" baking pan coated with nonstick spray. The batter is pretty thick so you will have to push it into the corners. Bake until golden and a toothpick placed in the center comes out mostly clean with a few moist crumbs attached, about 25 to 30 minutes.

    To make the frosting

    In a medium bowl, beat together butter, cream cheese and vanilla until smooth. Add confectioners' sugar and mix until smooth and creamy. Spread over the cooled bars.

    Sunday, February 15, 2009

    Snickerdoodle Blondies

    I saw this recipe on the blog, Culinary Concoctions by Peabody, and she made it look so delicious that I knew I had to try it. I made the blondies for Nick's Valentine's Day treat. He really liked them- so much that he had one for dessert and then again for breakfast the next morning! (I loved them too, but not for breakfast...) And he says this is a treat that he won't be taking to work because he wants to eat the entire pan himself.

    8 ounces (two sticks) unsalted butter, at room temperature
    1 cup granulated sugar
    1 cup loosely packed light brown sugar
    3 ounces Mascarpone cheese (I just used cream cheese because it is cheaper- not sure what the difference with Mascarpone would be)
    2 eggs
    1 tsp vanilla extract
    ½ tsp baking powder
    1 tsp baking soda
    pinch of salt
    ¾ tsp cream of tarter
    ¼ tsp freshly grated nutmeg
    2 cups all-purpose flour

    Cinnamon Sugar for coating (about 1/3 cup)- (I used 1/3 cup sugar and 4tsps cinnamon)

    Preheat oven to 350F.
    Butter a 9 by 13-inch pan. Sprinkle cinnamon sugar and move pan around to make sure that the bottom and sides are coated. Set aside.
    In a medium bowl, sift together the flour, baking powder, baking soda, salt, nutmeg, and cream of tarter.
    Using an stand mixer, cream together the butter and sugars. Beat for three minutes. Scrape down the bowl.
    Add the Mascarpone cheese and beat until fully incorporated.
    Add eggs, one at a time, scraping down the bowl after each addition.
    Add the vanilla and beat for another 30 seconds.
    On low speed add the sifted flour mixture. Mix until fully incorporated.
    Spread mixture evenly into prepared pan. This will be hard as it is a thick batter. I found it easiest to just wet my hands a little and press the batter into the pan. Then even it out afterwards with a spatula.
    Sprinkle more cinnamon sugar on top of the batter.
    Bake for 20-25 minutes.

    Saturday, January 3, 2009

    Chocolate Banana Bread Pudding


    Ingredients:
    * 4 Hawaiian Bread rolls (or equivalent amount of other kind of bread)
    * 1-1.5 ripe bananas
    * 2 eggs
    * 1/2 tsp vanilla
    * 1 cup milk
    * 1/4 cup cocoa powder
    * 1/2 cup sugar
    * 1/4 cup chocolate chips

    Directions:
    1. Cut bread into bite size pieces.
    2. Slice banana into same sized pieces as bread.
    3. Add bread, chocolate chips and banana to a loaf pan sprayed with cooking spray.
    4. Combine remaining ingredients and mix well.
    5. Pour egg and milk mixture over bread and banana mixture.
    6. Preheat oven to 350 degrees while bread soaks (you will want to let it soak for 15-20 minutes).
    7. Bake covered for 18 minutes and uncovered for 18 minutes.

    Friday, January 2, 2009

    Crunchy Pecan Bites

    I first had these when Ms. Janice made them at Thanksgiving. They were really good and seemed easy to make so I made them for Lynn's Christmas shower. Everyone seemed to like them. They are like little bites of pecan pie with less of the gooey filling, which means I like them a lot more than the pie! The recipe is from Southern Living. The only thing I did different was using phyllo shells that were not frozen so I only baked mine for about 12 minutes.


    Makes about 6 dozen
    Ingredients

    * 3 cups chopped pecans
    * 3/4 cup sugar
    * 3/4 cup dark corn syrup
    * 3 large eggs, lightly beaten
    * 2 tablespoons melted butter
    * 1 teaspoon vanilla extract
    * 1/8 teaspoon salt
    * 5 (2.1-oz.) packages frozen mini-phyllo pastry shells

    Preparation

    1. Preheat oven to 350º. Bake pecans in a single layer in a shallow pan 8 to 10 minutes or until toasted and fragrant.

    2. Stir together sugar and corn syrup in a medium bowl. Stir in pecans, eggs, and next 3 ingredients.

    3. Spoon about 1 heaping teaspoonful pecan mixture into each pastry shell, and place on 2 large baking sheets.

    4. Bake at 350º for 20 to 22 minutes or until set. Remove to wire racks, and let cool completely (about 30 minutes). Store in an airtight container for up to 3 days.

    Saturday, December 6, 2008

    Chocolate Eclair Cake

    I made this for November Goodie Day. It is one of my favorite desserts and really easy to make. I want to try it with sugar free pudding in the future.


    INGREDIENTS:
    * 2 (3.5 ounce) packages instant vanilla pudding mix
    * 1 (8 ounce) container light cool whip, thawed
    * 3 cups milk (I used 2%)
    * 1 (16 ounce) package graham cracker squares
    * 1 (16 ounce) package prepared dark chocolate frosting

    DIRECTIONS

    1. In a medium bowl, thoroughly blend the pudding mix, whipped topping, and milk.
    2. Arrange a single layer of graham cracker squares in the bottom of a 13x9 inch baking pan. Evenly spread half of the pudding mixture over the crackers. Top with another layer of crackers and the remaining pudding mixture. Top with a final layer of graham crackers.
    3. Spread the frosting over the whole cake up to the edges of the pan. (It is much easier to spread if you microwave the frosting for about 30 seconds, then pour it and spread on. You won't need the whole can of frosting). Cover, and chill at least 4 hours before serving.

    Saturday, November 8, 2008

    Apple and Rum Raisin Bread Pudding

    This bread pudding is from Baking Bites. It was really easy to make, and Nick liked it a lot. The original recipe is below with my changes/comments in parentheses.


    Ingredients:
    1 tbsp butter
    2 large baking apples (I used Fuji)
    4 cups cubed white bread (I used Hawaiian Bread)
    2 cups milk (I used 2%)
    3 tbsp brandy (I used rum b/c we did not have brandy)
    1/2 cup sugar
    1/4 cup brown sugar
    2 large eggs
    1 tsp vanilla
    1/4 teaspoon ground cinnamon
    1/8 tsp grated nutmeg
    1/4 cup raisins or pecans

    Peel and core apples. Chop apples into cubes, but precision is not required and the pieces can be fairly large.
    Heat a small frying pan over medium-high heat and add apples and butter. Cook for about 5 minutes, or until apples are light golden and just barely tender. Set aside to cool slightly.
    Preheat oven to 350F. Lightly grease an 8×8-inch square baking pan.
    Place bread cubes in a large bowl.
    In a medium bowl, whisk together milk, brandy, sugars, eggs, vanilla and spices. Pour onto bread cubes along with apples and raisins (or pecans, if using). Stir gently with a spatula to wet mixture and let stand for about 10 minutes. Pour into prepared pan, spread evenly.
    Bake for 40-50 minutes, until a sharp knife inserted into the center of the pudding comes out clean (a couple of crumbs are ok).
    Cool for at least 15 minutes before serving. Serve warm, at room temperature or chilled.