Friday, February 1, 2013

Chicken Chickpea Soup


With all the cold weather lately, I have really been craving some soup. I am bookmarking soup recipes left and right and have to control myself or else we would be eating soup every night. When I came across this Quick Chicken Chickpea Soup recipe on Eat, Live, Run , it moved to the front of the list because it seemed perfect for a day when I knew my time slot for cooking dinner was going to be short.  It was really delicious and flavorful. Also, super healthy! I think it must have been the swiss chard and the scent of the ginger that made it seem extra healthy. I ate the leftovers for breakfast and lunch the next day if that tells you how much I liked it!

Chicken Chickpea Soup (adapted from Eat, Live, Run)

Ingredients

  • 1 shallot, minced
  • 2 large carrots, sliced
  • 2 stalks celery, diced
  • 2 inch knob of ginger, minced
  • 2 cloves of garlic, minced
  • 1 jalapeno, seeded and thinly sliced
  • 1 Tbsp olive oil
  • 2 quarts chicken broth
  • 1 rotisserie chicken, shredded
  • 14.5 oz can of chickpeas, drained and rinsed
  • juice of 1/2 lemon
  • 1 bunch of swiss chard, chopped
  • Salt and pepper to taste
Directions
  1. Saute the shallot, carrot, celery, ginger, garlic and jalapeno in the olive oil for about five minutes, until veggies start to soften.
  2.  Add the broth, chickpeas, and shredded rotisserie chicken. Bring to a simmer.
  3.  Then add the salt, pepper, lemon juice, and swiss chard. Simmer until greens wilt (about five minutes) then serve.

Friday, January 25, 2013

Browned Butter Toffee Chocolate Chip Cookies


I took a hiatus from the blog for several reasons, but one of them being that I know nothing about photography and hated posting pictures that are...well, just not good. However, I have come across several good recipes in the mean time and hate that I can keep track of them all when I want to go back and make them again. Thus, I am going to try to resume posting when I have time despite bad pictures. Maybe one day I will get motivated to learn more and go back and update my pictures. Maybe. Anyway, let's start with these cookies! I made them primarily because I had a partial bag of toffee chips in my pantry that I wanted to use up, and it had been a while since I made any treats for Nick! They turned out to be even more delicious than I expected. Now I just have to control myself that Nick actually gets to eat some :)

Browned Butter Toffee Chocolate Chip Cookies (adapted from une gamine dans la cuisine)
Makes about 18 cookies

Ingredients:

  • 1 stick unsalted butter
  • 1.5 cups all-purpose flour
  • 3/4 teaspoons baking Soda
  • 1/4 teaspoon salt
  • 1 cup dark brown sugar (firmly packed)
  • 1 room temperature egg
  • 1/2 teaspoon vanilla extract
  • 3 oz  toffee bits 
  • 5 oz of dark or semi-sweet chocolate chips 
  • Coarse sea salt
Directions:
  1. Preheat oven to 350 F and line baking sheets with parchment paper.
  2. Brown the butter. Place the butter into a heavy-bottomed saucepan or skillet. Heat on medium heat until melted. Continue cooking, swirling pan often until butter is dark golden brown and has nutty aroma. This takes a few minutes, but when it happens, it happens quickly so keep an eye on it! Remove the pan from heat and let cool. 
  3. In a mixing bowl, whisk together the flour, baking soda and salt. Set aside.
  4. In the bowl of a stand-mixer, fitted with the paddle attachment, beat the cooled butter and brown sugar for 3-4 minutes, scraping down the sides of the bowl if needed. 
  5. Add the egg and vanilla and beat until thoroughly mixed in. 
  6. Turn the mixer to low speed and slowly add the dry ingredients, mixing only until just combined.  
  7. Add toffee bits and chocolate chips and mix briefly so they are incorporated but be careful not to overmix!
  8. Roll dough into balls (mine were probably 2 Tbsp in size).
  9. Bake for 10-12 minutes.
  10. Immediately after removing from oven, lightly sprinkle with sea salt.
  11. Let cool on cookie sheet to set before moving to a cooling rack


Tuesday, January 1, 2013

Savory Pumpkin Cornbread Mini Muffins

I can't remember when I first typed up this recipe, but I would guess at least a year and a half ago. I keep coming back to it so I decided it was finally time to take pictures of them so I could share it with you! We are having them with our new years dinner tonight, but they are also great served with chili or even eaten just on their own! I love, love, love cornbread, but it is generally not so healthy for you. I tried to lighten up this recipe by adding pumpkin and taking out butter and oil. It results in light and fluffy muffins that come in at about 55 calories each, which is a good thing because I always eat several at a time!

Savory Pumpkin Cornbread Mini Muffins (Makes 12 mini muffins)
Ingredients:
  • 1/2 cup cornmeal 
  • 1/2 cup whole wheat pastry flour 
  • 1 tsp baking powder
  • 1/4 tsp cayenne pepper
  • 1/2 tsp salt
  • 1/4 tsp baking soda
  • 1/8 tsp black pepper
  • 1/2 cup pumpkin
  • 2 tsp maple syrup
  • 1/2 cup low fat buttermilk (I use the lemon juice + milk substitute)
  • 1 egg

Directions:
1. Preheat oven to 350 degrees
2. Combine the dry ingredients (cornmeal through pepper) in a  medium bowl.
3. In a separate bowl, mix together the wet ingredients (pumpkin through egg).
4. Add the wet ingredients to the dry ingredients and stir just until combined.
5. Spray a mini muffin pan with nonstick cooking spray and spoon batter into pan.
6. Bake until a toothpick is inserted and comes out clean- approximately 14-17 minutes.

Approximate Nutrition Facts: (according to My Fitness Pal)
Calories: 54
Carbs: 10g
Fat: 1g
Protein: 2g

Monday, August 22, 2011

Basil Hummus

 I have been on a hummus kick lately but never actually made my own. (I'm pretty fond of Sabra's Roasted Red Pepper). When I came across this creamy basil hummus on Daily Garnish, I knew it was the first kind to try on my own!  I made it to go with one of my favorite summer meals: hummus and vegetable pizzas! It was delicious, and the basil flavor was really strong- in a good way. It reminded me of a healthier version of pesto. It was so easy to make, and I can't wait to start experimenting with other flavors!

Creamy Basil Hummus (from the Daily Garnish)
Ingredients:
  • 1 can garbanzo beans, rinsed and drained
  • 1 cup basil leaves
  • 2 tbsp lemon juice
  • 2 tbsp olive oil
  • 2 tbsp tahini
  • 1 tbsp water (I used 2, but would maybe use 3-4 next time for a less thick consistency)
  • pinch of salt
 Directions:
  1. Put basil and chickpeas in food processor. Pulse to chop combine.
  2. Add lemon juice, water, olive oil, tahini, and salt.
  3. Continue to run the food processor (you may need to stop and scrape down the sides a couple of times) until the hummus is smooth and creamy.

Monday, June 20, 2011

Super Fudgy Brownies

 Last weekend I made these brownies to serve at my cousins bridal shower. Since I have become a lazy blogger, I didn't really have any intentions of posting the recipe. But after several requests for the recipe and one woman even declaring it "the best brownie she had ever eaten," I knew this one was a keeper! They were really moist and fudgy without being gooey. I am posting the original recipe below with a few notes in parentheses. One other thing to note is that I ran out of granulated sugar while making these and replaced it with coarse sugar. I am not sure how much of an impact this made on the brownies so I will have to experiment with that in the future, but I am sure the results would be similar either way! I was just happy to know that you could use coarse sugar without it resulting in a grainy texture.

The Baked Brownie (from Baked: New Frontiers in Baking and seen on Divine Baking)
Ingredients:
  • 1 1/4 c all-purpose flour
  • 1 tsp salt
  • 2 T dark unsweetened cocoa powder (I used dutch process cocoa)
  • 11 oz dark chocolate, chopped (I used Ghiradelli 60% cacao)
  • 1 c unsalted butter, cut into 1 inch pieces
  • 1 tsp instant espresso powder (I omitted b/c I didn't have)
  • 1 1/2 c granulated sugar
  • 1/2 c packed light brown sugar
  • 5 large room temperature eggs
  • 2 tsp pure vanilla extract
Directions:
1. Preheat oven to 350 degrees F.
2.  Spray a 9x13 pan with nonstick baking spray (or butter and flour pan).
3.  In a medium bowl, whisk together the flour, the salt, and cocoa powder.
4. Set up a large sized double boiler. Place the chocolate, the butter, and the instant espresso powder (if using) in the bowl of the double boiler and stir occasionally until the chocolate and butter are completely melted and combined. Turn off the heat, but keep the bowl over the water of the double boiler and add both sugars. Whisk the sugars until completely combined and remove the bowl from the pan. Mixture should be room temperature.
5. Add three eggs to the chocolate mixture and whisk until just combined. Add remaining eggs and vanilla, whisking to combine. Do not over beat the batter or else the brownies will become cakey. 
6. Gently mix the flour/cocoa/salt into the chocolate with a spatula (not a whisk) just until incorporated.
7. Pour the mixture into the prepared pan.
8. Bake the brownies for about 30 minutes or until a toothpick comes out with just a few moist crumbs. Mine took 31 minutes, but you may want to check them early because everyone's oven is different, and you definitely don't want to over bake them!

Thursday, April 28, 2011

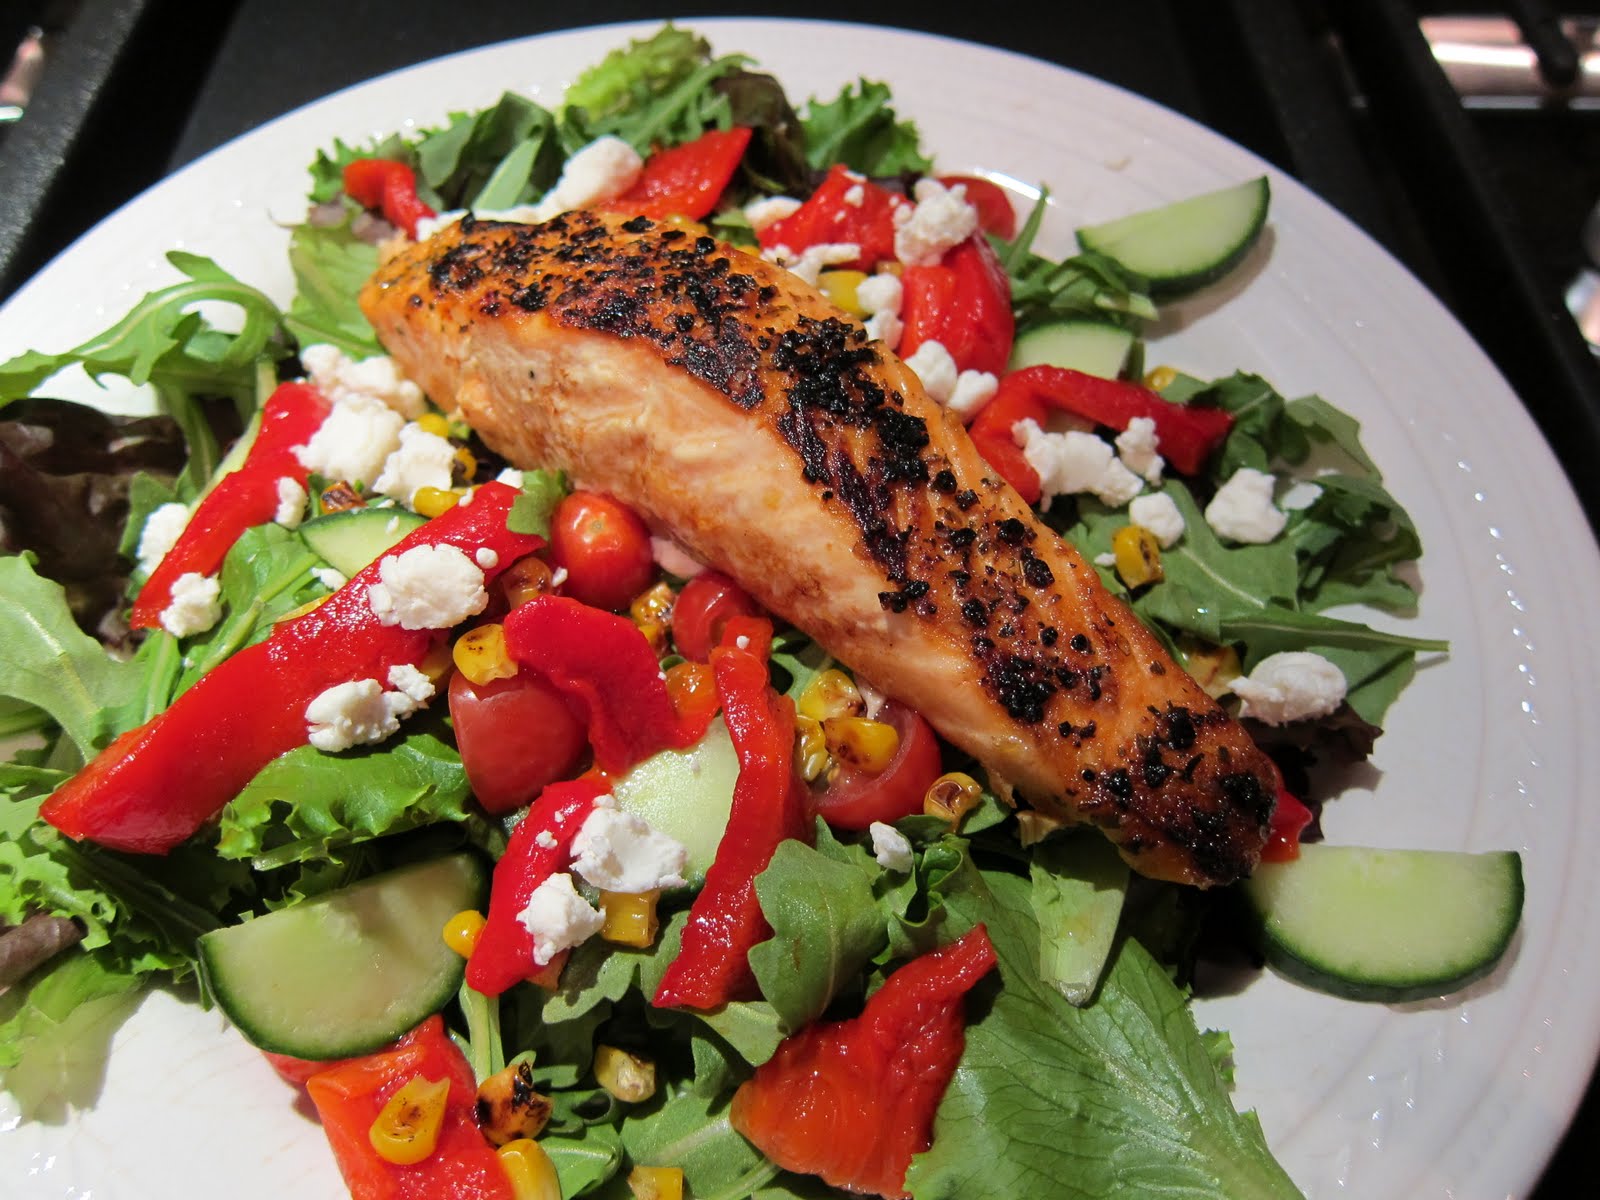
Salmon Salad with Roasted Red Peppers, Corn, and Goat Cheese

In my opinion, you can't really beat a delicious salad topped with salmon in both nutrition and taste! Salads are so flexible in that you can use whatever have on hand or happen to want that day, but I wanted to share this salad because I absolutely loved the combination of ingredients. It has tangy goat cheese, sweet roasted corn and red peppers, cucumbers, tomatoes, and is topped with a simple, yet delicious balsamic vinaigrette. As I write this and remember how good it was, I am thinking that I will have to make this again next week!
Salmon Salad with Roasted Red Peppers, Corn, and Goat Cheese
(Serves 4) 
Ingredients:
  • salad mix (I used half arugula and half mixed greens)
  • 4  4-5oz salmon fillets (I prefer wild caught)
  • Williams-Sonoma Potlatch Seasoning  (optional)
  • 2 tsp olive oil
  • 1 red pepper (or you can use jarred roasted peppers and skip steps 1-2)
  • 1/2 cup frozen corn
  • 1 small cucumber, sliced
  • 1 cup grape tomatoes, halved
  • 1/2 cup crumbled goat cheese
  • balsamic vinaigrette 
Directions:
  1. Preheat oven to 425 degrees.
  2. Place pepper on a cookie sheet and roast for about 20 minutes, turning half way. It may take longer, but you are looking for your pepper to turn mostly black. Remove from oven and place in a plastic bag (such as a ziploc). Once pepper has cooled, remove from bag, and peel skin. It should come off easily. Slice pepper into strips and remove seeds.
  3. Heat a nonstick skillet over medium heat. Add frozen corn and cook for 2-5 minutes, stirring occasionally until some kernels start to blacken. Turn off heat. Put corn in a dish and return skillet to cooktop.
  4. Season salmon with Potlatch Seasoning, if using, or with salt and pepper.
  5. Add 2 tsp of olive oil to skillet and turn heat to medium. Once pan is heated, place salmon in pan seasoned side down.
  6. Cook salmon until done, turning half way. Cooking time will vary depending on thickness of salmon, but it should flake easily when done. I would guess 8-10 min total, but watch it so you don't overcook it!
  7. While salmon is cooking, assemble salads. Place greens on bottom and top with red peppers, goat cheese, corn, tomatoes, and cucumber. Top with salmon and serve with balsamic vinaigrette.

Tuesday, April 12, 2011

Migas

I had never had migas before, but had read about them on a couple of blogs. So, when I received Tostitos Artisan Recipes chips as a part of the Foodbuzz Tastemaker program, I knew just what I wanted to make! I used the Pioneer Woman's recipe as a guide. I figured she would be a trusty source, and I had never used one of her recipes before, which I can't believe knowing how popular her blog is! These were really good! In fact, I have already made them twice within a month! Of course, I did cheat by using the Tostitos chips rather than frying my own tortillas. That was one step too many for me, and the Tostitos chips were great! I think Nick accurately described them as "the adult version of Doritos." We received both the black bean and garlic flavor and the fire roasted chipotle flavor. I am not sure that Nick had a favorite between the two, but my vote was definitely for the black bean and garlic. Anyway, on to the delicious recipe...

 Migas (adapted from the Pioneer Woman)
 Serves 4-5 people
Ingredients:
  • 1/3 cup corn tortilla chips, broken into pieces
  • 1 whole Jalapeno, Seeds And Membranes Removed, Finely Diced
  • 4 whole Plum Tomatoes, Roughly Chopped
  • 1 whole Green Pepper, Roughly Chopped
  • 1 whole Red Bell Pepper, Roughly Chopped
  • 1 whole Medium Onion, Chopped
  • 12 whole Large Eggs
  • ¼ cup reduced fat mexican blend cheese
  • 1/2 Tablespoon Butter
  • 1/2 Tablespoon Olive Oil
  • ¼ cup 2% milk
  • 1/2 avocado
  • salt and pepper
 Directions:
1. In a bowl, whisk together eggs and milk. Set aside.
2. In a large skillet over medium-high heat, melt the olive oil with the butter. Add onions and bell peppers and cook until starting to turn brown/black, about 3 to 4 minutes. Add in diced jalapenos and stir to combine. Add tomatoes to the skillet and stir around, then add chips, stirring gently to combine.
3. Reduce heat to low.
4. When the heat has decreased, pour eggs into skillet. Sprinkle with salt and pepper. Stir gently to cook with the peppers, folding mixture very gently as it cooks.
5. Add in grated cheese.
6. Once eggs are cooked and cheese is melted, removed from skillet and serve topped with avocado. 

Sunday, April 3, 2011

Samoas Bars

It has become the tradition here on Chicken on the Green to post the special treat made to honor Meggo's Birthday! For her 25th, there was the Strawberry Chantilly Cake. For her 26th, I made Monster Cookies. And today.... SAMOAS BARS! I chose to make these because Samoas (or Caramel deLites as they are known in some parts of the country such as Wichita) are Meggo's favorite Girl Scout cookies! She would buy them at work and then hide them in her desk. Meggo, please don't hide these. They do not quite have the same preservatives in them!
 I found the recipe for these on Baking Bites. These bars start with a shortbread cookie crust, then are covered with caramel and toasted coconut, dipped in dark chocolate, and topped with a dark chocolate drizzle. Yummy. They are fun to make although they do take some time. They are very reminiscent of the original, but if I am going to be completely honest, I don't quite think they match up to the perfected recipe those girl scouts have come up with. Man, they must work hard on those.
Samoas Bars (adapted from Baking Bites)
Ingredients:
Cookie Base:
  • 1/2 cup sugar
  • 3/4 cup butter, softened
  • 1/2 tsp vanilla extract
  • 2 cups all purpose flour
  • 1/4 tsp salt
Topping:
  • 3 cups shredded coconut (sweetened or unsweetened)
  • 12-oz good-quality chewy caramels
  • 1/4 tsp salt
  • 3 tbsp milk
  • 10 oz. dark or semisweet chocolate (chocolate chips are ok)
Directions:
To make the crust:
1. Preheat oven to 350F.
2. Line a 9×13-inch baking pan with nonstick foil and spray with nonstick cooking spray. (I really didn't want it to stick).
3.  In a large bowl, cream together sugar and butter, until fluffy. Add vanilla extract.
4. Working at a low speed, gradually beat in flour and salt until mixture is crumbly, like wet sand. The dough does not need to come together.
5. Scoop crumbly dough into prepapred pan and press into an even layer.
6. Bake for 20-25 minutes, until base is set and edges are lightly browned. Cool completely on a wire rack before topping.

To make the topping:
1. Unwrap the caramels and place in a large microwave-safe bowl with milk and salt. Cook on high for 3-4 minutes, stopping to stir a few times to help the caramel melt. When smooth, fold in toasted coconut with a spatula.
2. Put dollops of the topping all over the shortbread base. Using the spatula, spread topping into an even layer. Let topping set until cooled.
3. When cooled, cut into 30 bars with a large knife.
4. Once bars are cut, melt chocolate in a small bowl. Heat on high in the microwave in 45 second intervals, stirring thoroughly to prevent scorching. Dip the base of each bar into the chocolate and place on a clean piece of parchment or wax paper. Transfer all remaining chocolate (or melt a bit of additional chocolate, if necessary) into a piping bag or a ziploc bag with the corner snipped off and drizzle bars with chocolate to finish. (I had to melt more chocolate because I had bits of shortbread that fell in my chocolate.)
5. Let chocolate set completely before storing in an airtight container.


Monday, March 21, 2011

Irish Car Bomb Cupcakes

Beer in cake? Yes, please. St. Patrick's Day may have come and gone, but I won't be waiting until next year to make these again! I told Nick these may be my new favorite cupcakes, which is quite a bold statement for me! The chocolate cake has a great flavor with a VERY subtle taste of Guinness, and the Bailey's frosting was just as delicious. Drinkers and non-drinkers alike will love these so get in the kitchen and make them ASAP!
Irish Car Bomb Cupcakes (adapted from Annie's Eats)
Makes 24 cupcakes
Ingredients:
For Cake:
  • 16 tbsp. unsalted butter
  • 1 cup Guinness
  • ¾ cup dutch process cocoa powder
  • 2 cups all-purpose flour
  • 2 cups sugar
  • 1½ tsp. baking soda
  • ¾ tsp. salt
  • 2 large eggs
  • 2/3 cup light sour cream
For Frosting:
  • 8 tbsp. unsalted butter, at room temperature
  • 3 cups confectioners’ sugar
  • 5-6 tbsp. Bailey’s Irish cream
Directions: 
For Cupcakes:
1. Preheat oven to 350 degrees F and line 2 pans with cupcake liners.
2. Bring Guinness and butter to simmer in medium saucepan over medium heat. Add cocoa powder and whisk until mixture is smooth. Remove from heat and allow to cool a little.
3. In a large mixing bowl, combine the flour, sugar, baking soda and salt.
4.  In the bowl of an electric mixer fitted with the paddle attachment, beat together the eggs and sour cream to blend.  Add the chocolate-beer-butter mixture and beat just to combine.
5. Mix in the dry ingredients on low speed just until incorporated.
6. Divide the batter evenly between the cupcake liners, filling them about 2/3 to 3/4 full.
7. Bake until a toothpick inserted in the center comes out clean, about 16-17 minutes.
8. Allow to cool in the pan for 5-10 minutes, then transfer to a wire rack to cool completely.


For Frosting:
1. Place the butter in the bowl of a stand mixer fitted with the paddle attachment.  Beat on medium-high speed until light and fluffy, about 2-3 minutes.
2. Gradually add the powdered sugar until it is all incorporated.
3. Mix in the Bailey’s until smooth.
4. Add any additional sugar or Bailey's to reach desired consistency.
5.  Frost the cupcakes once they have completely cooled.

Thursday, March 17, 2011

White Chicken Chili

It may seem odd to post a recipe for a warm bowl of chili just as the weather finally shows signs of long, long awaited spring, but this is a recipe I didn't want to forget! I found it on Jenna's blog, Eat Live Run, and it was really good- the best I have had to-date! It has a pretty mild spice to it so if you want really spicy, I would kick up the amount of cayenne. Also, just FYI it freezes well so it is a great make-ahead meal. I made a couple minor changes to lighten it up a little, and those changes are reflected below. (Click on the link for the original version). I can't wait to make this again next winter... or during the inevitable cold front that always comes as soon as I think we are safe into spring!
White Chicken Chili ( adapted from Eat, Live, Run)
Ingredients:
  • 1 lb boneless skinless chicken breast, cubed
  • 1 medium onion, small diced
  • 1/2 tsp olive oil
  • 2 cans cannellini beans, drained
  • 14.5 ounces chicken broth
  • 2 4-ounce cans chopped green chilies
  • 1 tsp salt
  • 1 tsp cumin
  • 1 tsp dried oregano
  • 1/4 tsp cayenne
  • 2 garlic cloves, minced
  • 1/2 cup 2% milk
  • 6 ounces light sour cream
Directions:  1. Heat the oil in a large pot over medium high heat. Add the chicken and onion and cook for about 5-6 minutes, or until the chicken is seared and the onion is translucent.
2. Add the garlic and cook for another 3 minutes.
3. Add the beans, spices, chicken broth and green chilies and bring to a boil. Reduce heat and simmer for about 30 minutes.
4. Turn off the heat and add the sour cream and milk.
5. Enjoy

Sunday, February 6, 2011

Maple Bacon Cupcakes

 Happy 27th Birthday to my old man husband! I love picking out what I am going to make for his birthday "treat" each year, and this year I thought that Maple Bacon Cupcakes would be perfect knowing what a bacon lover he is! I have seen bacon used in several dessert recipes, but I had never tried it for myself. These cupcakes are a great salty sweet dessert, but I have to say that he was not able to tell that they were bacon until I told him what the secret ingredient was. Knowing what it was, I could definitely taste it when I had a bacon bit in a bite but not so much when I got a bite with out it. Either way, he seemed to enjoy them! Their texture is more muffin-like that cake in my opinion as they are a bit crumbly, but the delicious maple frosting definitely removes any confusion that they are anything but a cupcake! I made the recipe exactly as written on the blog, Vanilla Garlic, so you can click here to get the recipe. However, I would recommend doubling the frosting because I ran out and had to make another batch. Also, I got 9 cupcakes from the recipe rather than the 6 that is stated. Let me know what you think if you try them!
Action shot.

Sunday, January 16, 2011

Wheat Hamburger Buns

The idea of making your own hamburger buns seemed kind of ridiculous to me at first. Why in the world would you go through that trouble when you could buy some decent ones for just a couple of bucks? I had seen a couple recipes for buns on other blogs but I pretty much just looked over them because I knew I would NEVER make them- or so I thought. But it turns out that I was wrong. It all started when I decided I would buy some buffalo meat at the grocery. It was very hectic, and I just grabbed it without checking the price, which I rarely do. As I was checking out, I realized it cost $11! Holy cow. There is no way I am just going to use this buffalo to make chili like originally planned. So, I decided to make burgers, but of course I didn't have any buns. Well, I guess it was time to make them, and it actually was a pretty good way to spend my lazy Saturday!
I found the recipe on Annie's Eats. I love her blog because I have never been disappointed by one of her recipes! Mine didn't look nearly as pretty as hers, but I'm used to that! I also used half whole wheat flour to up the nutritional value. I loved the addition of the whole wheat taste, but Nick thought they were a little "too wheaty" for him although he still enjoyed them. So, you can make that call yourself as to how much white vs wheat flour you want to use. We loved them topped with a delicious bison burger- yum! Recipe below is Annie's and my changes are noted in the parentheses.

Whole Wheat Hamburger Buns (adapted from Annie's Eats)
Makes 8 buns

Ingredients:
1 tbsp. sugar
2 ¼ tsp. instant yeast
¼ cup warm water (105°-115°)
1 cup warm milk (105°-115°) (I used 2%)
1 tbsp. vegetable oil (I used olive oil)
1 tsp. salt
3 to 3 ¾ cups all-purpose flour (I used half whole wheat)
1 egg beaten with 1 tbsp. cold water
sesame, poppy or caraway seeds, or coarse salt, for topping (I used sesame seeds)

Directions:
1. In a bowl of an electric mixer, dissolve the sugar and then the yeast in the warm water.  Add the milk, oil, salt and 1 ½ cups of flour to the yeast mixture.  Beat vigorously for 2 minutes. (I wasn't sure which attachment I should use since I am a bread newbie, but I used the paddle attachment and that worked just fine).
2. Gradually add flour, 2 tablespoons at a time, until the dough begins to pull away from the sides of the bowl *.  (This will vary but mine was pulling away after I added 1.5 cups for a total of 3 cups).
3. Switch to the dough hook and knead until you have a smooth and elastic dough, about 7-9 minutes. 
4. Transfer the dough to an oiled bowl. (I just sprayed my bowl with my olive oil mister). Turn once to coat the entire ball of dough in oil. 
5. Cover with a tightly-woven dampened towel and let rise in a warm area until doubled, about one hour. 
6. Turn the dough out onto a lightly oiled work surface.  Working with oiled hands, divide the dough into 8 equal pieces.  Shape each piece into a ball, and flatten into 3 ½ -inch disks.  For soft-sided buns, place them on a well-seasoned baking sheet a half-inch apart so they will grow together when they rise.  For crisper bun, place them three inches apart. ( I spaced mine out.)
7. Cover with a towel and let rise until almost doubled, about 45 minutes. 
8. About 15-20 minutes before you want to bake the buns, preheat the oven to 400°.  Just before baking, brush the tops of the buns lightly with the egg wash and sprinkle with any desired toppings. 
9. Bake for 15-20 minutes or until the internal temperature of the bread reaches 190°. (I used my meat thermometer for this, which worked well and they were done in 15 minutes). When the buns are done, remove them from the baking sheet to cool on a wire rack.  This will prevent the crust from becoming soggy.

* Annie's Note: This particular dough should be quite slack, i.e. very relaxed in order to make soft and tender buns.  So you want to add only enough more flour, past the 3 cup point, to make the dough just kneadable, sprinkling in only enough more to keep it from sticking to you or the work surface.

Thursday, December 30, 2010

Southwestern Chicken Soup

I LOVE making soup in the winter. It is just so hearty, warm, filling, and healthy! I make it pretty often (and by "pretty often" I mean Nick is probably sick and tired of it!), but I have so many recipes that I like such as this one and this one that I don't try all that many new ones. I am really glad I tried this one as it will probably go into the regular rotation :) It is slightly spicy from the jalepeno but not at all too hot (you could add more if you really want spicy), and the sweetness of corn was a great addition! It is also great for feeding a crowd. I tripled the recipe below for our community group, and I think everyone liked it :) The recipe is from Cooking Light, but I made a few changes which are reflected below. 
 Southwestern Chicken Soup (adapted from Cooking Light)
Serves 4
Ingredients: 
  • Cooking spray
  • 1  cup  diced onion
  • 2/3  cup diced green bell pepper
  • 2 cloves of garlic, minced
  • 1  jalapeño pepper, seeded and minced
  • 1  pound of chicken breast, cut into bite-sized pieces
  • 2  cups  fat-free, less-sodium chicken broth
  • 2  teaspoons  chili powder
  • 1  teaspoon  ground cumin
  • 1/2  teaspoon  salt
  • 1/4  teaspoon  black pepper
  • 1  (15-ounce) can pinto beans, rinsed and drained
  • 1  (14-ounce) can diced tomatoes, undrained
  • 1  cup  diced avocado
  • 1 cup of frozen sweet corn
Directions:
1. Heat a small nonstick Dutch oven over medium-heat. 
2. Coat pan with cooking spray or a little olive oil. 
3. Add onion, bell pepper, garlic, and jalapeño to pan; sauté for 2 minutes. 
4. Add chicken; cook 3-5 minutes. 
5. Add broth and next 6 ingredients (through tomatoes); bring to a boil. Partially cover, reduce heat, and simmer until chicken is done, stirring occasionally.
6. Add corn and cook until corn has thawed.
7. Remove from heat. 
8. Serve with avocado.

Monday, December 20, 2010

Tate's Bake Shop Sugar Cookies

Let's talk about sugar cookies. Christmas is really their season. While they are delicious any time of the year, I think the time they really shine is during the holidays because of all the pretty colored frosting and sprinkles. Most often though, it is the "cut out" sugar cookies rather than the "drop" kind that you see around. While the cut out ones are awfully pretty and festive, I feel like they just can't compare to the taste of the drop cookies, not-to-mention that they are definitely less time consuming. I think we can all agree that we could use a little extra time during Christmas! I know more hours in the day is definitely at the top of my wish list :) Now, these cookies in particular are something special. My decorating skills may be lacking, but these cookies definitely made up for that in taste! They had a great flavor and texture- soft and chewy on the inside and slightly crispy on the bottom. They will definitely be my "go-to" recipe in the future!
Old Fashioned Sugar Cookies (from Tate's Bake Shop Cookbook, seen on Smells like Home)
(Recipe yielded about 40 med-lg cookies) 
Ingredients:
  • 3 1/4 cups all-purpose flour
  • 1 tsp baking soda
  • 1 tsp baking powder
  • 1/4 tsp salt
  • 3/4 cup salted butter, room temperature
  • 2 cups sugar
  • 1 tbsp vanilla
  • 1 large egg
  • 1 cup sour cream
Directions:
  1. Preheat the oven to 350 degrees.
  2. Line cookie sheets with parchment paper. (You don't have to do this, but the bottoms came out more browned when I didn't)
  3. In a medium bowl, combine the flour, baking soda, baking powder, and salt.
  4. In a large bowl, cream the butter and sugar until the mixture is light and fluffy. 
  5. Add the vanilla and egg.  Mix together.
  6. Then, add the sour cream and mix it well.  
  7. Add the flour mixture and mix it until it is combined.
  8. Drop the cookies onto the prepared cookie sheets 2-3 inches apart as they do spread.
  9. Bake for 12-15 minutes or until they are light brown.  Cool them on the cookie sheets for about 5 minutes, and remove them to wire cooling racks to cool completely.
 For the Frosting:
Ingredients:
  • 1 cup (2 sticks) unsalted butter, at room temperature
  • 1 tsp vanilla extract
  • Pinch of salt
  • 4 cups confectioners’ sugar, sifted
  • 2 tbsp milk
  • Food coloring (optional)
Directions:
  1. Beat butter with a mixer for about 1 minute or until smooth.
  2. Add vanilla, salt, sugar, and milk and beat again until smooth.
  3. Add food coloring if you want and spread over cooled cookies. 

    Sunday, December 12, 2010

    Pear Salad with Maple Vinaigrette

    Making your own salad dressing is really quite simple and takes a salad from good to delicious! So often I rely on bottled salad dressing, but the extra 5 minutes it takes to make is really worth it- that is if you have an extra 5 minutes on that given day! I loved how the slight sweetness of the maple came through and also gave it a more seasonal flavor as maple really makes me think of the fall and winter. It was great on the pear salad, but I also used the leftovers through out the week on a salad with apples, which was equally delicious.

     Pear Salad with Maple Vinaigrette (from Taste of South magazine)
    Ingredients:
    For Salad:
    • Bibb lettuce (or any kind you prefer)
    • Pear
    • Dried cranberries
    • Blue cheese
    • Toasted walnuts
      For Dressing: 
    •  1/4 cup  maple syrup  
    •  1/4 cup  olive oil
    •  3 tablespoons  balsamic vinegar
    •  1 tablespoon  Dijon-style mustard
    •  1/4 teaspoon  ground black pepper
    •  1/8 teaspoon salt 
     Directions:
    1. Place handful or 2 of lettuce on each plate and top with pear, blue cheese, dried cranberries, and walnuts.
    2. Combine all dressing ingredients together in a bowl and drizzle on top of salad.  

    Saturday, December 4, 2010

    Pumpkin Polenta with Turkey Sausage and Greens

     Whenever I come across recipes with greens in them, I instantly think "Oh, delicious! I HAVE to make that," even when it is cooked spinach, which after several tries I am always disappointed in it and never learn my lesson! However, when I stumbled across Cara's Blog, I saw pumpkin polenta (delicious), turkey sausage (delicious), and swiss chard (hmmm- never had it but it sure looks delicious), I immediately knew I wanted to make it! I saw the swiss chard at the grocery store, but i chickened out and went with the safe choice of collard greens because I know I love those! Also, they come in a pre-cut and washed bag, which was a big selling point.

     
    Nick and I both loved this! The polenta was so creamy without adding any cream or butter, and the addition of the pumpkin was not only healthy, but also really tasty. I may never make polenta without pumpkin again! We had some leftover that Nick ate for dinner the next night, and I have to admit I was a little jealous (not that the leftover soup that I had eaten for the past 5 meals wasn't delicious...) Can't wait to make this again!

    Pumpkin Polenta with Turkey Sausage and Greens (adapted from Cara's Cravings)
    Serves 3 
    Ingredients: 
    For the polenta:
    • 1.5 cups pumpkin puree
    • 3/4 cup course ground polenta (I used Bob's Red Mill)
    • 2.25 cups of water
    • salt and pepper
    For the Turkey Sausage and Greens Saute:
    •  3 links spicy turkey sausage, casing removed
    • 1/2 sweet onion, thinly sliced
    • 3 cloves of garlic, minced
    • 1 tsp olive oil
    • 8 oz trimmed collard greens (I used half a bag of these, which are washed and ready to go)
    • 3/4 cup halved grape tomatoes
    • 2 Tbsp balsamic vinegar
    • 1/4 cup chicken broth
    • salt and pepper
    Directions:
    1. In a nonstick skillet over medium heat, cook the turkey sausage, stirring to crumble.  Once it has cooked through, remove it from the pan and put on a plate lined with a paper towel.
    2. In the same skillet, heat 1 tsp olive oil over medium heat.
    3. Add onion and garlic, sprinkle with salt and pepper, and cook until tender.
    4. Add tomatoes and collard greens to pan and cook for a couple of minutes. Then add chicken broth, balsamic vinegar, and season with salt and pepper. Continue cooking until they are wilted.
    5. Turn off heat and add turkey sausage back to the pan. Set aside.
    6. Combine water and pumpkin in medium or large sauce pan. Bring to a boil. 
    7. Slowly stream in the polenta, stirring constantly so it does not clump. Continue to cook stirring often with a whisk until thickened, about 10-15 minutes. Season with salt and pepper. If you have a handy assistant, they can complete steps 6-7 while you do steps 1-5 :)
    8. If necessary, reheat turkey sausage and greens mixture.
    9. Serve by dividing polenta among plates and topping with turkey sausage and greens mixture.

    Saturday, November 20, 2010

    Healthy Stuffin Muffins

     A few weeks ago I received a loaf of Nature's Pride Oven Classics 100% Whole Wheat Bread as a part of the Foodbuzz Tastemaker Program. I decided it would be perfect to make a "healthified" version of my favorite Thanksgiving side dish- stuffing! Although I suppose it is technically dressing since it isn't stuffed into a turkey. However, "Dressing Muffin" doesn't quite have the same ring to it as "Stuffin Muffin!" I love the muffin form because it not only bakes faster, but it is also a perfectly portioned serving.  Try adding these to your Thanksgiving table for a yummy and healthy side dish!
     
    Ingredients:
    Makes 12 Stuffin Muffins
    • 10 pieces of whole wheat bread, toasted
    • 1 tsp olive oil
    • 2/3 cup finely diced onion
    • 2/3 cup finely diced carrot
    • 2/3 cup finely diced celery
    • 1 cup reduced sodium chicken broth
    • 2 tsp poultry seasoning
    • 3/4 cup Trader Joe's butternut squash soup 
    • 1 egg, beaten
    • salt and pepper
    Directions:
    1. Preheat oven to 375 F.
    2.  Cut toasted bread into cubes and put in a medium bowl.
    3. In a nonstick skillet over medium heat, saute the onion, carrot, and celery in olive oil. Sprinkle with salt and pepper.
    4. Once the veggies begin to soften, add the poultry seasoning. Add a splash of chicken broth and stir around to evenly coat the veggies with the seasoning.
    5. When the veggies have softened, add them to the bowl with the bread cubes.
    6. Add the egg, butternut squash soup, and chicken broth to the bowl and stir around so bread absorbs all the liquid.
    7. Let sit for a few minutes to soak.
    8. Spray a muffin pay with nonstick cooking spray. 
    9. Divide the batter evenly among the muffin pan.
    10. Bake until cooked through- about 25-30 min.

    Thursday, November 11, 2010

    Skinny Mashed Potatoes

     Mashed potatoes are a classic American side dish, but I always shy away from them because the generally have so much butter and cream added to make them "good." I have made some in the past that I thought turned out ok, but they weren't really "blog-worthy." Now I am happy to say that I have found the recipe that I will be making from now on! They don't have to be unhealthy to taste good!
      Skinny Mashed Potatoes (Serves 4)
    Ingredients:
    • 1 lb red potatoes, diced
    • 8 oz cauliflower
    • 1/4 cup milk 
    • 1/4 reduced sodium chicken broth
    • 1 oz reduced fat cream cheese
    • 1/4 tsp ground black pepper
    • 3/4 tsp kosher salt (use less if using regular table salt) 
    • chives (optional) 
    Directions:
    1. Steam potatoes and cauliflower until fork tender.
    2. Heat milk, chicken broth, and reduced fat cream cheese in a microwave-safe bowl for about 30 seconds.
    3. Add potatoes, cauliflower, salt, and pepper to the bowl.
    4. Mash all ingredients together until desired consistency is reached. (Don't use a food processor or hand blender unless you want them to be like glue... learned that one the hard way!)
    5. Top with chives and serve!
    Approx nutrition facts per serving:
    Calories: 115
    Fat: 0.5 g
    Carbs: 23g
    Protein: 5g

    Saturday, November 6, 2010

    Rustic Cranberry Apple Galette with Preserved Walnuts

     I love "rustic" dishes because basically that means you don't have to be precise or make it look perfect. It's charming all on its own. This galette was full of fall flavors, and I loved that it wasn't overly sweet. I also liked the pop of the tart cranberries contrasted with the sweetness of the apples. The addition of the preserved walnuts was a special treat, but you can definitely substitute regular walnuts or leave them out altogether. I had never even heard of preserved walnuts before, but Nick's mom gave us some on our last visit. I was determined to find a way to use them seeing as they aren't the most common ingredient, and this dessert was perfect because they complemented the fruits well. Another plus about this recipe is that it is so easy I was able to throw it together on weeknight!
     Rustic Cranberry Apple Galette with Preserved Walnuts
    Ingredients:
    • 1 unbaked pie crust
    • 2 large apples, large diced- about 1 lb (I used Jonagold) 
    • 1/2 cup cranberries
    • 1/2 cup chopped preserved walnuts (or regular walnuts)
    • 1.5 Tbsp cinnamon
    • 3 Tbsp sugar
    Directions:
    1. Pre heat oven to 350 degrees F.
    2. Toss apples, cranberries, walnuts, cinnamon and sugar together in a bowl.
    3. Roll out pie crust and place on a baking sheet lined with parchment paper.
    4. Place cranberry apple filling in middle of the pie crust, leaving a border of about 1-2 inches. The pile will probably appear to be too much/too high, but this is ok because it will cook down. 
    5. Bake for about 45 minutes or until pie crust has browned slightly.
    6. Let cool for at least 15-20 minutes before serving. 

    Sunday, October 31, 2010

    Pumpkin Whoopie Pies

     I think the best thing about fall is pumpkin- actually I know it is the best thing! I first made these whoopie pies about 3 years ago and never made them again because they were too addictive! The soft, moist texture of the cookie/cake is hinted with fall spice and the sweetness is matched perfectly with the slightly tangy cream cheese filling. I knew it was time for the hiatus to end so this pumpkin lover's birthday could be properly celebrated! These treats are perfect for Halloween, Thanksgiving, or even your office party :)

    Pumpkin Whoopie Pies (adapted from Brown Eyed Baker)
    Makes about 2 dozen whoopie pies 
    Ingredients:
    For Whoopie Pies-
    • 3 cups all-purpose flour
    • 2 tablespoons cinnamon
    • 1 teaspoon baking powder
    • 1 teaspoon baking soda
    • 1 teaspoon salt
    • 1½ teaspoons pumpkin pie spice
    • 1 cup granulated sugar
    • 1 cup dark brown sugar
    • 1 cup canola or vegetable oil
    • 3 cups canned pumpkin puree
    • 2 eggs
    • 1 teaspoon vanilla extract
    For Maple Cream Cheese Filling:
    • 2.5 - 3 cups powdered sugar (start with 2.5 and add more if you want it sweeter!)
    • 8 ounces reduced fat cream cheese, at room temperature
    • 1 stickunsalted butter, at room temperature
    • 3 tablespoons maple syrup (I used grade A dark amber)
    • 1 teaspoon vanilla extract
      Directions:
      1. Preheat oven to 350 degrees F. Line baking sheets with parchment paper.
      2. In a large bowl, whisk together the flour, cinnamon, baking powder, baking soda, salt, and pumpkin pie spice. 
      3. In a separate bowl, add the granulated sugar, dark brown sugar, oil, pumpkin puree, eggs and vanilla together and whisk until combined.
      4. Gradually add the flour mixture to the pumpkin mixture and stir just until completely combined.
      5. Use a large spoon to drop a rounded, heaping tablespoon of the dough onto the prepared baking sheets, about 1 inch apart.
      6. Bake for 10 to 12 minutes, until they look done and a toothpick inserted into the center of a cookie comes out clean. The cookies should be firm, but not overly so when touched. Remove from the oven and let the cookies cool completely.
      7. To make the filling, beat the butter on medium speed until smooth. Add the cream cheese, maple syrup, and vanilla. Beat until smooth and combined, about 2 minutes. Add the powdered sugar and beat until smooth.
      8. To assemble the whoopie pies: Turn half of the cooled cookies upside down. Pipe or spoon the filling onto that half. Place another cookie, flat side down, on top of the filling. Press down slightly so that the filling spread to the edges of the cookie. Repeat until all the cookies are used.
      9. Store in a single layer if possible, but if not, use parchment paper between layers.