Saturday, August 28, 2010

Creamy Roasted Corn Soup

Summer is my favorite season, and one of the best things about it are the delicious fruits and vegetables. It seems that summer is coming to an end way too quickly, and I didn't want to miss the chance to take advantage of the fresh corn at the farmer's market. When I saw this recipe, I knew it was the perfect recipe to showcase the natural sweetness of the corn. I also loved how healthy it was. Generally thick, creamy soups like this are made with cream and butter, but this one is thickened with rice and pureed corn and squash. The corn we bought was so good that I had to restrain myself from eating all of it raw! And the soup was so delicious that I wanted to eat the whole pot myself. Unfortunately, I had to share it with Nick... I topped it with some leftover roasted okra, but really it was lost in the soup so no worries if you don't have any!
Creamy Roasted Corn Soup (adapted from Naturally Ella)
Serves 2
Ingredients:
  • 3 ears of sweet corn
  • 1 medium yellow squash
  • 1 Anaheim pepper, diced (remove seeds for less heat)
  • 1 clove garlic
  • 1 Tbsp olive oil
  •  2 cups vegetable broth
  • 1 cup water
  • 1/2 cup white rice
  • 1/2 cup skim milk 
  • salt and pepper
Directions:
  1. Preheat oven to 400 degrees.
  2. Remove the husk and silk from the corn and cut off the kernels. I found it helpful to put it in a bowl and cut so the kernels don't fly everywhere.  
  3. Dice the squash, garlic and peppers and toss with olive oil.
  4. Spread vegetables on a baking sheet and sprinkle with salt and pepper and roast for 30-35 minutes.
  5. Meanwhile combine broth, water, and rice in a medium pot. Bring to a boil and then reduce to a simmer until rice is cooked.
  6. When the vegetables are done roasting, add them to the broth and rice. 
  7. With an immersion blender, blend mixture until it has very few chunks left in it. 
  8. Add milk and blend until thoroughly incorporated. Reheat soup if needed. 

Thursday, August 19, 2010

Roasted Tomato Sauce with Turkey Sausage


Warning: This is not a quick and easy recipe. You do not want to make it on a weeknight when you get home from a long day at work. Now that we got that out the way... this is an entirely delicious pasta sauce that you DO want to make! And make it soon- before tomato season is over!! As I have said before, I was always "anti- making my own pasta sauce" because I didn't think it could be that much better. But, I have to say, it is really worth it when you have the time. This recipe is similar to the sauce I made earlier this year, but the big difference is that it uses fresh tomatoes!Ah, so good....

Roasted Tomato Sauce with Turkey Sausage (adapted from Culinary Disaster)
Ingredients:
  • 3 lbs tomatoes (I used fresh Roma from our farmer's market)
  • 1 red pepper
  • 5 cloves garlic
  • olive oil, about 2-3 Tbsp total
  • 1 cup red wine (I used a pinot noir)
  • 1 onion
  • 1 lb spicy turkey sausage, casing removed
  • pinch of rosemary, thyme, and oregano
  • dash of crushed red pepper flakes (optional)
Directions:
  1. Preheat oven to 425 degrees.
  2. Cut an X in the bottom of the tomatoes (just enough to break the skin).
  3. Place the pepper, tomatoes, and garlic cloves on a baking sheet and rub with  1-2 Tbsp olive oil.
  4. Roast for 45 minutes to an hour. If they do not look charred at this point, you may want to broil them for a few minutes. (I broiled mine on low for about 5-10 minutes at the end.)
  5. Remove pan from the oven and cover with plastic wrap for 10 minutes. This will make everything easier to peel.
  6. Peel tomatoes, pepper, and garlic once they are cool enough to handle. 
  7. Heat a medium or large pan with about 1 Tbsp olive oil over medium heat.
  8. Add turkey sausage to the pan, stirring to crumble. Once sausage is cooked, remove it from the pan. 
  9. Add onion to the pan and saute until it softens.
  10. Add the cup of wine to the pan to deglaze, scraping any browned bits from the sausage and onion with a wooden spoon. Reduce wine by half.
  11. While it is reducing, blend the peeled pepper, tomatoes, and garlic. I used my wonderful stick blender, but you can use a regular blender if you don't have one. 
  12. Add tomato mixture and spices (oregano, rosemary, and thyme) to the pan with the wine and onion. Raise to a simmer.
  13. Add the sausage back to the pan and simmer together for about 30 minutes.   

Friday, August 13, 2010

Lemon Blueberry "Cheesecake" Muffins

I threw these muffins together last week just using some stuff I had on hand and had no intention of adding them to the blog, but Nick convinced me otherwise. Every time he ate one he kept saying how much he liked them, especially the texture. So, I had to try one and was surprised that they turned out as well as they did. They are have a light lemon flavor that goes great with the burst of blueberry flavor hidden in the bottom of them, and the texture is very unique- almost like a hybrid between a muffin and cheesecake.
 Ingredients:
  • 1/2 cup butter, softened
  • 8 oz part-skim ricotta cheese
  • 2 oz  nonfat greek yogurt
  • 2 eggs
  • 1/2 tsp salt
  • juice of 2 meyer lemons (regular are fine if you can't find meyer)
  • 1 cup granulated sugar
  • 1 cup cake flour
  • 2 tsps baking powder
  • 1 tsp vanilla
  • 1 cup fresh blueberries
Directions:
  1. Preheat oven to 350 degrees.
  2. In a medium bowl, combine flour, salt, and baking powder.
  3. In a second bowl, cream together butter, sugar, eggs,  Greek yogurt and ricotta. Stir in vanilla and lemon juice.
  4. Add dry ingredients and stir until completely incorporated, but be careful not to over mix. 
  5. Stir in blueberries.
  6. Line muffin pan with cupcake liners or spray with nonstick cooking spray and divide batter among prepared muffin cups.
  7. Bake until done (when a toothpick comes out clean). Mine took about 25 minutes.

Sunday, August 8, 2010

Baked Tilapia with Dill Sour Cream

It seems that I keep adding to my list of "things to make" a lot faster than I am actually able to make them, but lately I have noticed a tendency of being drawn to the "easy recipes" first. This one is no exception! It requires minimal work, but you wouldn't know it from the results! I love the flavor of dill, and it especially goes well with fish. I initially saw this recipe on Kalyn's Kitchen, but made a few changes that are shown below. I also used tilapia instead of halibut because it was easier to find and cheaper, but you could use any mild white fish you wish.
 Baked Tilapia with Dill Sour Cream
Serves 2 (adapted from Kalyn's Kitchen)
Ingredients:
  • 2-3 tilapia filets (about 8-12oz total)
  • 3 Tbsp low fat sour cream
  • 1 Tbsp mayo made with olive oil
  • 1 clove garlic, minced (or 1/4 tsp garlic powder)
  • 1/8 tsp Beau Monde seasoning (optional, but I like it!)
  • 1 Tbsp grated Parmesan cheese
  • 1 Tbsp fresh dill, chopped (you can use dried, but reduce to 1/2 tsp)
  • salt and pepper
  • 3 green onions, sliced
 Directions: 
  1.  Preheat oven to 375 degrees.
  2.  Season tilapia with salt and pepper and place in a baking dish.
  3. Combine sour cream, mayo, beau monde, garlic, dill, and Parmesan.
  4. Spread an even layer of the sour cream mixture over the fish.
  5. Bake for 15-20 min until firm. This will vary depending on the thickness of your fish. (Ours took about 16 min, but the fillets were pretty thin). 
  6. Sprinkle with green onions and serve. 

Friday, August 6, 2010

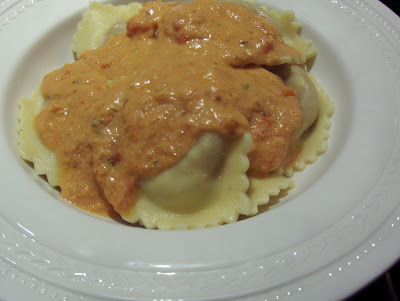
Buitoni Braised Beef and Sausage Ravioli

Most nights I enjoy cooking dinner, but sometimes its the last thing I want to do or I just don't have time unless I want to eat dinner at 8:30 or later! It's nights like these that I generally turn to the freezer for a quick meal. That's why I was really excited to receive my choice of a Buitoni Riserva Frozen Pasta as a part of the Foodbuzz Tastemaker program. Since I knew that Nick would mostly likely be eating this (or at least MOST of it!) I let him pick which one he wanted to try, and he chose the Braised Beef and Sausage Ravioli with Creamy Marinara! I have to say it was a good choice! He really liked it and was happy to eat it since he was wanting some pasta for dinner! I liked that the pasta and sauce could be cooked in one pot for easy clean up, and once the water boiled, it was ready in 5 minutes! I also liked the taste of the ravioli, but I didn't care much for the sauce. Although I don't know that my opinion should count since I think all creamy sauces are just too rich for me. Overall, I give it a good review...and apologize for the picture- I promise it tastes better than it looks!

Wednesday, August 4, 2010

Mocha Nutella Bread Pudding

 One of the things I love about bread pudding is that it is so versatile. You can be creative when making it and use any number of ingredients that you probably have on hand. It can be savory or sweet, somewhat healthy or definitely not! In this case, it definitely is on the decadent side with the use of heavy cream! We had some in the refrigerator and Nick just hated seeing it go to waste so it had to be used ;) You can always just use milk and still have great results. We also had some Nutella left from the palmiers so when I found this recipe for Nutella bread pudding, I knew it was something I should make! I did change the recipe a little by substituting coffee for some of the milk giving it a mocha flavor, which also brought out the chocolate flavor. It was a good combo!


Ingredients:
  • 4 cups of day old bread cubes (I used ciabatta bread)
  • 1/4 cup Nutella
  • 4 eggs
  • 1 cup heavy cream
  • 1/2 cup 2% milk
  • 1/2 cup brewed coffee
  • 1/2 cup brown sugar
  • 1 tsp vanilla
Directions:
1. Preheat oven to 350 degrees.
2. Spray an 8x8 pan with nonstick cooking spray with flour.
3. Spread a bit of Nutella on each bread cube. This doesn't have to be exact in any way just slather or dab it on however you want.
3. In a large bowl, whisk together eggs, brown sugar and vanilla until smooth. Stir in milk, coffee and cream. Add the bread. Let the mixture sit for 30 minutes.
4. Pour the mixture into the pan. Bake until the pudding is set in the center, about 45 minutes or until set and edges begin to brown. Let cool for at least 15 minutes before serving